Tags:
°SS2 °tutorial
Please post only corrections for the tutorial here. Ask questions in
Engineering.
This is an updated version of the original ShockEd tutorial and documentation written with the new dark (2.4+) version in mind. DromEd and ShockEd are used interchangeably in this tutorial, and both refer to the same program.
What's On The ScreenThe DromEd main program interface is separated into four distinct sections:
1) A menu bar at the top of the screen, as seen in any Windows-based program.
2) Four separate view windows, which allow you to examine your levels from four different perspectives. These windows are "3D View," "Top," "Right," and "Front." You can use the bracket keys to cycle through the different windows, with the white outline indicating which is currently the "active" window.
3) Several buttons used for a variety of functions.
4) A command line (in the small box outlined in light blue) used to enter specific DromEd commands.
Note: You cannot change the screen resolution once dromed has loaded. To change screen resolution you have to add "edit_screen_size 800,600" to user.cfg or dromed.cfg using a text editor such as notepad. To change to another resolution simply use the other standard resolution numbers, 640x480, 1024x768 etc, following the same format of the command above. Choose a resolution that is slightly smaller than your monitor's native resolution, otherwise part of the menus may be cut off.
In new dark there is also a separate 'MONO' window opened which shows command processing and the like. For the purposes of this tutorial it is of limited importance, but it is very useful for more advanced functions. Some warning lines in yellow may show on loading ShockEd, do not be concerned by this.
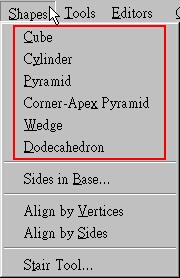
Brushes and PortalizingIf you have no experience building levels for 3D games, the first thing you need to do is familiarize yourself with the term "brush." In DromEd, anything that gets created which effects the terrain is called a brush. Rooms are referred to as "room brushes," lights are called "light brushes," etc. The most common brush is the "operation brush," used to create terrain (hollowed-out "rooms" and solid objects). DromEd allows the user to create spaces using six different shapes of operation brush: cube, cylinder, pyramid, corner-apex pyramid, wedge, and dodecahedron.

You can think of the default Shock level as being completely solid and stretching infinitely in all directions. In other words, before you add any brushes, the world is just an infinitely huge block of solid. You carve away from that block to create rooms, stairs, structures, and other unique architectural features. So, to create a square room, you would use a cube-shaped operation brush, filled with air, to carve away a square in the center of the existing solid block.
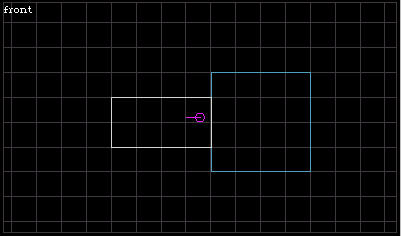
As you can see by looking at the different view windows, there's already a beginning operation brush in place (a cube) and you're standing right in the middle of it, as indicated by the violet-colored icon. This icon represents your camera within the world when editting, and the arm which sticks out represents your current facing.
The view that the camera sees is shown on the 3D view windows. As we haven't portalised yet (told dromEd to build our plans) the 3D view window is still black.
For now, look at the buttons that reads "Op." Click on the arrows < > to see the different types of brushes you can create. After you've seen all the choices, go back to "Fill Air," because we want to create an air brush, which is essentially a hollowed-out room. Remember, the existing universe is already a giant, solid block, so we need to fill a brush with air to create a room.

Now that you've set the brush selection to "Fill Air," it's time to "portalize" the level so the change actually takes place in the game world. So, go to the menu bar on the top of the screen, click "Tools," then click "Portalize." Be patient as DromEd processes the brushes. Small levels with just a few brushes usually portalize in just a couple of seconds, but when your levels get larger and more complex, portalization may take a couple of minutes or more. Look at the center of the white bar on the very bottom of the DromEd screen; when it reads "done," the level has been portalized. Whenever you alter the terrain in the level, using one of the 2D view windows, you will need to portalize to see new changes in the 3D View window and in the game itself.
Note: Dromed will remind you if you need to reportalize when you go in game, with a 'Current Portalization Out of date' warning and will then ask you whether you wish to reportalize.
You should then see the default cube, covered with default blue/white/pink 'jorge' texture.
Viewing Brushes / Moving around in the View WindowsYou can use the WSAD keys to nagivate: W move forwards, S move backwards, A rotate anticlockwise and D rotate clockwise. Z and C cause the camera to sidestep, Q and E move the camera up and down, and head tilt is controlled by R and V. Move about the square and you will notice that the view of three 2D view windows should move automatically with the cameras at the centre, this is because the viewpoints are in synch with each other. You can stop this by right clicking on the 2D window and select asynch all.
You will see that you can also zoom in, zoom out, hide grid, etc by right clicking on the 2D view windows. You can teleport instantly to a location by right clicking on the point you wish to go in the view windows. You can also change the selected view window to solo view. Of course you can change the view window to unsolo again. You can make the whole map to fit in the windows by choosing fit to region.
Note: After zooming in or out of the viewpoints that window will become desynched. To resynchronise it right click and then click synch all.
Creating Brushes and Game ModeLet us now create another fill air brush adjacent to the existing one. Make sure the buttons "Create" and "Brush" are active (purple) and op brush type is "Fill Air". If you have changed them, return them to these settings. Then left click on the edge of the white square (existing fill air brush) on the 2D view window and drag out the shape of the next one so that it covers a few of the grid squares. After releasing you will have a new brush.
The brush you dragged out is snapped to the gridlines. The gridsnap is a handy function as it allows your levels to be streamlined. When using it you can be fairly sure that all your terrain will line up with itself, however you may be unhappy with the current snap settings - when the grid snap setting is large you cannot create fine detail. To decrease the level of the snap use the arrows < > next to the "Grid Size" button. A Grid Size of 14 is sufficent enough for general detail. Avoid using Grid Size less than 11.
You should notice that the new brush is white in colour because it is active (selected). The square brush becomes blue in colour because it is inactive. By left clicking on either brush you make it active. If you don't like the new brush, press
Del key or click Del button to delete it.
Select your new brush if it is not currently selected, and then rotate your camera to face your new brush. In the 3D view window you will see that the brush appears behind the Jorge texture and hasn't actually carved any space out yet. This is because we haven't portalised. Reportalise now by selecting Portalize under Tool menu and the new brush should be carved out.
| |
| Before reportalise | After reportalise |
Worlds in dromed are by default pitch black, and require either brush or object light to be added. As a usability feature, while designing we can turn fully brightened lighting on without adding these brushes or objects.
A toggle command switches between this complete lighting mode or normal lighting. To use this command, click on the command line and a purple line cursor should appear. Type 'toggle_lighting' on the command line and then press
Enter. (Pressing
Shift and
; keys also activates the cursor in the command line. If for some reason you cannot move about or delete an object, you probably activated the command window, press
Enter or
Escape to abort this.) Since there are no lighting sources at present the level ought to become dark, though not completely.
Tip: one useful usability aid is the autocomplete function of the command line. If you type 'togg' then
tab the command autocompletes. If more than one command is a possible autocompletion hitting
tab again cycles through them.
Typing toggle_lighting again reactivates the bright lighting. toggle_lighting also effects object lighting, though at present there are none in the level. For those familiar with previous version of ShockEd this command replaces the 'light_bright' and 'lit_obj_toggle' commands which should no longer be used. The difference between toggled on lighting (left) and toggled off lighting is shown below.
Note: If you create your new brush in the Top window you should notice that the brush has the same height as the original one. This is a standard feature, as the windows are two dimensional you define two of the dimensions by dragging and the third is obtained from the brush that was previously selected.
When making a level it is often handy to jump into game mode and walk about your level as you would if you were playing through SS2. This is known as 'game mode' and in most respects is identical to playing SS2 as you would through the sshock2 executable.
To enter game mode you press
Alt +
G. To return to editor mode press
Alt +
E. As most standard SS2 commands work in game mode it is possible to bring up the main menu with escape and then quit there- this is a bad idea as it will shut down ShockEd and you may lose your work!
Once in the game mode you have all the normal movement controls, and as we are using an editor we have access to the full range of commands. You can access the command line by pressing the
Shift and
;, game play should freeze and you should be able to type in commands- for example you can use 'toggle_lighting' to turn full lighting on and off. However you cannot yet collect keys, nanites and weapons, this will be discussed later.
Once you have finished looking about your rooms press
Alt +
E to return to the editor mode.
New dark ShockEd has a backup system where returning to editor mode returns the level to its state prior to entering game mode, so long as you do not configure it otherwise or use the main game menu to quit. Without this backup any changes made in game mode would persist in the level design, as was the case with pre new dark versions of ShockEd
Using TexturesYou have created some brushes but all the walls of the brushes are covered by Jorge texture. To make them look real, we need to put textures, wallpaper if you like, on the walls. The textures are held in texture families - the textures are split into groups where similar textures exist together. This allows you to load a family of similar textures into the editor. To load up texture family you usually use the command 'add_family [familyname]' in the command line. For example, type 'add_family shared' on the command line and press enter. New dark versions have removed many of the old restrictions on formats and sizes for texture files, however it is likely that most new editors will still want to use the existing textures.
Now, let's add another texture family, using a different method. Press
alt +
T to open the texture palette. This shows all the currently loaded textures as thumbnail tiles. Right clicking on the palette opens a menu from which various operations can be performed, in this case load a new family, msg from the via the right click menu.
From this palette you can put textures on walls and remove specific textures that you do not want. The texture highlighted in pink is the currently selected texture. Two textures are always available for selection, 'Jorge' and 'Sky'
Select a texture in the texture window. Which one is not important, though do not choose either sky or jorge. Once you have chosen click on one of the jorge covered faces in the 3d view.
You will see the texture has been instantly applied in the 3D view window, if you don't, it means that your portalisation is out of date. The editor will only update the textures in 3D view window if the portalisation is current. Reportalise the level if necessary. Double clicking a texture in the texture window will apply it directly to the currently selected (orange framed) face.
You may also want to put a texture on all faces of a brush at once. To do this, first close the texture palette with
alt +
T, then select a brush to apply the textures to via the 'top' 'right' or 'front' wireframe panes. At centre bottom you can see the texture currently applied to the brush as a default- at present it will be jorge, even if you have added textures to some faces. Select a brush face via the 3d view that has a texture applied and you will see that texture rather than jorge, and it will show which face you have selected rather than default. You can cycle through which face is selected using the
, and
. or by using the < > buttons by 'face'. For the moment return to the default face and open the texture palette. Double click a texture to select it and put it on as default- this would also work for any other face. Close the texture palette.
Despite changing the default texture all faces will remain with whatever texture you have assigned them- or jorge. To apply the texture to all faces click the 'reset' button.
Note: If you want to remove unused textures and retain used textures of a texture family, enter 'compress_family [familyname]' in the command line or from the right click menu of the texture palette. If you want to remove a texture family
including used textures, use 'remove_family [familyname].' This is not recommended though, as any faces using removed textures will revert to jorge. These commands can also be accessed by right clicking in the texture palette window.
Moving, Resizing and Rotating Brushes and TexturesAfter adding textures to the brushes, the brushes should look like this in the 3D view window.
One thing which seems wrong is the dimensions, the wall texture tesselates twice, and when you go into game mode the fact that you are standing in a large room is striking. Let's resize the brush so that it looks slightly more realistic. Look for three buttons which read "D", "W", and "H." These stand for depth, width and height respectively and the units are approximation of feet.

Looking at the boxes next to the buttons we can see that the default brush was set to 16x16x16 and the brush that you created had similar values. Let us decrease the height of the default room. Select the original brush (the square one) and hold down the Ctrl key. Then position the cursor over Right or Front view windows and press and hold the left mouse button. Then move the mouse around to resize the brush. Up and down will change the height, and left to right will adjust the depth and width depending upon which window you clicked on. Move the brush around until the height is approximately at 8, and then release. It does not have to be precise as the grid should still be active and it should snap to that whole value.

You can also see that from looking at the 2D view windows that the new smaller room is half way up the other one, lets lower it so that everything has the same floor level. Ctrl key resizes brushes and shift key moves them, hold down shift key and perform the same mouse operations but this time the brush should move up and down. Align it so that it has the same floor level as the other brush. The numbers which correspond to the movement are shown in the boxes of buttons "X", "Y" and "Z."
If you look in the 3D view window you will see that the white rectangle indicating the brush has moved but the actual textures haven't, and they won't until we reporatlise. Do so now.
| |
| Before reportalise | After reportalise |
There are other ways of changing the position and dimensions of brushes. You can enter in specific numbers for the brush by clicking on the number and typing in a new one, being careful to make sure that any old zeros are not present. Changing a brush in this way doesn't test grid snap - grid snapping is only checked when you move a brush with the shift key or resize it using the Ctrl key, so you could be awkward and set a height value of 9 if you wished, but as soon as you use shift or Ctrl key on it the grid snap will take effect.
Another way of performing these changes is to use the < > arrows next to each button, these will move the number in very small increments, 0.01 to be specific. This is quite slow and is only useful when making fine alterations, usually when working with shapes which have to be very small such as a sign or when moving objects about as grid snap only applies to brushes.

Let's create an iron girder. As we want to create a solid, we need to use the "Fill Solid" operation brush. If we change the "op" button from "Fill Air" to "Fill Solid" now, the currently selected brush will change to fill solid brush. To avoid this, we create a fill air brush first and change it to fill solid when we finish. Left click and drag out a rectangular shape in the Top view window for the girder. As the grid is probably still set to 16 it will snap to either 0, 8 or 16. We need to be able to create finer detail than that so decrease the grid snap to 14 using the arrows next to the "Grid Size" button. Then resize the brush so that it is a girder shaped cuboid. Once you are satisfied, change the brush from "Fill air" to "Fill solid" and reportalise. Then add textures to the brush.

We shall now rotate the girder! The rotation key is Alt, holding it down and dragging will rotate the object. Once you have rotated it you may have to move it so that it stretches from corner to corner, and you will notice that the numbers in the boxes of buttons "H", "P" and "B" change (Heading, Pitch and Bank).
The girder is probably slightly too small as you are now stretching from corner to corner. Use Ctrl key to resize the girder. Once you have finished rotating, moving and resizing the girder reportalise.
The texture of the girder is currently aligned with the world but not with the shape. The grid lines are still vertical and horizontal. We are going to align the texture with the shape. Click on the front face of the girder so it is selected, the texture thumbnail should change to that texture. For ShockEd with default resolution (640x480), click on "Align" button if it is there, and the buttons should change to the texture rotation and position mapping controls. (For 800x600 or other resolutions, just look down for the buttons.) You now have "U" and "V" buttons, which control the horizontal and vertical displacement of the texture, "Scale" and "Rotation" buttons.
| | | | | | |
| Click on "Align" button | | | | | | "U", "V", "Scale" and "Rotation" buttons (640x480 resolution) |
"U", "V", "Scale" and "Rotation" buttons (800x600 resolution)Clicking on "Txt" button will change back to the usual controls but we don't want to do that. If we click on the "AlignNorm" button the texture will be aligned with the shape rather than the world. We could do this manually be setting the rotation to the correct value, but with this method the editor aligns it for you.
The default scale (16) of texture doesn't directly compare to the dimension, decreasing the scale to 15 will mean that the texture tesellates twice as much so it will be more detailed. Now decrease the scale to 15, and you will notice that the texture isn't aligned.
To change the alignment of a texture you use the "U" and "V" buttons. There is no shortcut key for this, but clicking on either button and dragging left or right will change the setting. This works for scaling, rotating or moving as well, you just click on the correct letter button, "X" or "H" for example, and hold and drag. Play about with the "U" and "V" buttons and observe how they alter the texture.
Currently the ceiling texture isn't aligned with the room, so we need to rotate it. Because lines of the texture run diagonally not vertically, so we have to use the "Rotation" button rather than "AlignNorm", a value of 45 degrees will rotate the texture in line with the room.
Dromed has a variety of other geometric shapes available, but the one you will use most often is the cuboid, you can change the shape you are using by selecting a different one from the shape menu, some of which have a variable number of sides, and the side number is set by the Shapes->Sides in Base, by default it is four. Another handy tool is the cloning, if you press insert key or click on the "Clone" button, the currently selected brush will be copied, and the copy will be pasted over the existing brush. So if you select your girder, and then press insert key and then drag using shift key you can easily create another girder on the other side of the room.


 Loading...